Setting up Natural Language Search#
Kolena supports natural language and similar image search across image data registered to the platform. Users may set up this functionality by enabling the automated embedding extraction process or manually extracting and uploading corresponding search embeddings using a Kolena provided package.
Setting up Automated Embedding extraction#
Requirements
- This feature is currently supported for Amazon S3 integrations.
- Kolena requires access to the content of your images. Read Connecting Cloud Storage: Amazon S3 for more details.
- Only account administrators are able to change this setting.
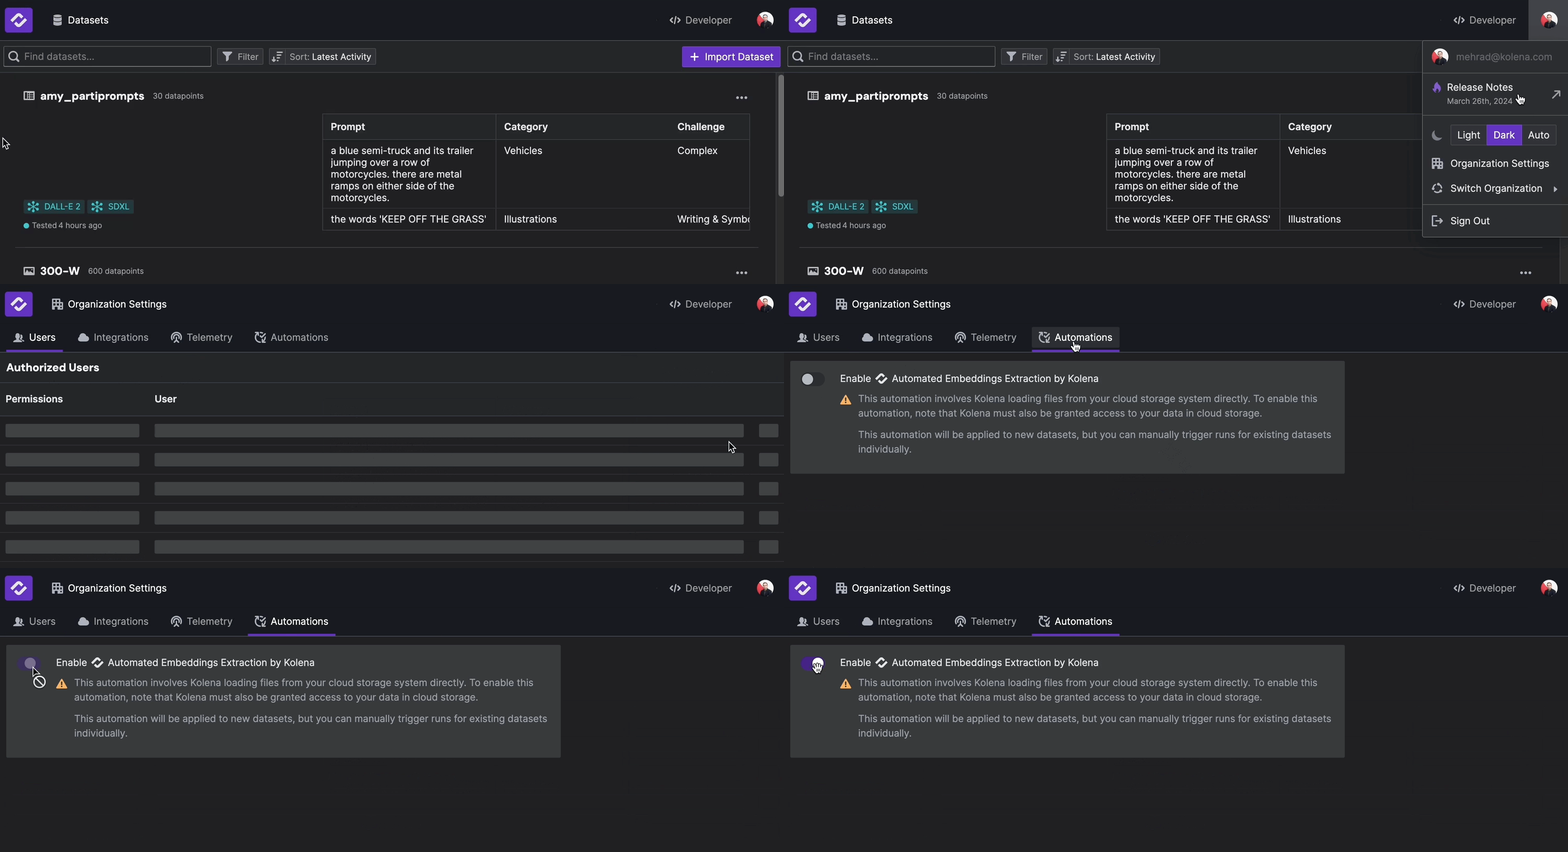
Embedding extractions allow you to find datapoints using natural language or similarity between desired datapoints. To enable automated embedding, navigate to "Organization Settings" available on your profile menu, top right of the screen. Under the "Automations" tab, Enable the Automated Embeddings Extraction by Kolena option.

Once this setting is enabled, embeddings for new and edited datapoints in your datasets will be automatically extracted.
Uploading embeddings manually#
If your organization does not allow Kolena access to the images, or you have custom embedding extraction logic, you may upload those embeddings manually to enable Natural Language and Similar Image search on Kolena.
In this document, we will go over main components of the below and steps you need to take to tailor it for your application.
Example
The Kolena repository includes a
code example for
extraction and uploading embeddings. It builds on data from the
semantic_segmentation
example dataset, so ensure the dataset is uploaded to your Kolena environment before running the code example.
Uploading embeddings to Kolena can be done in four simple steps:
- Step 1: installing dependency package
- Step 2: loading dataset and model to run embedding extraction
- Step 3: loading images for input to extraction library
- Step 4: extracting and uploading search embeddings
Step 1: Install kolena-embeddings Package#
The package can be installed via pip or uv and requires use of your kolena token which can be created
on the
Developer page.
We first retrieve and set our KOLENA_TOKEN environment variable.
This is used by the uploader for authentication against your Kolena instance.
Run the following command, making sure to replace
This package provides the kembed.util.extract_embeddings method that generates
embeddings as a numpy array for a given PIL.Image.Image
object.
Step 2: Load Dataset and Model#
Before extracting embeddings on a dataset, we need to load the dataset. The dataset
seeded in the semantic_segmentation
example contains image assets referenced by the locator
column, and we load the dataset in to a dataframe.
The embedding model and its key are obtained via the load_embedding_model() method.
kolena.initialize(verbose=True)
df_dataset = download_dataset("coco-stuff-10k")
model, model_key = load_embedding_model()
Step 3: Load Images for Extraction#
In order to extract embeddings on image data, we must load our image files into a
PIL.Image.Image object.
In this section, we will load these images from an S3 bucket.
For other cloud storage services, please refer to your cloud storage's API docs.
s3 = boto3.client("s3")

def load_image_from_accessor(accessor: str) -> Image:
    bucket_name, *parts = accessor[5:].split("/")
    file_stream = boto3.resource("s3").Bucket(bucket_name).Object("/".join(parts)).get()["Body"]
    return Image.open(file_stream)

def iter_image_paths(image_accessors: List[str]) -> Iterator[Tuple[str, Image.Image]]:
    for locator in image_accessors:
        image = load_image_from_accessor(locator)
        yield locator, image
Tip
When processing large scales of images, we recommend using an Iterator to limit the number
of images loaded into memory at once.
Step 4: Extract and Upload Embeddings#
Once embeddings are extracted for each locator on the dataset, we create a dataframe with
embedding and locator columns, and use the upload_dataset_embeddings method to upload
the embeddings.
The dataframe uploaded is required to contain the ID columns of the dataset in order to
match against the datapoints in the dataset.
In this example, the ID column of the dataset is locator.
def extract_image_embeddings(
    model: StudioModel,
    locators_and_filepaths: List[Tuple[str, Optional[str]]],
    batch_size: int = 50,
) -> List[Tuple[str, np.ndarray]]:
    """
    Extract a list of search embeddings corresponding to sample locators.
    """

locator_and_image_iterator = iter_image_paths(locators)
locator_and_embeddings = extract_image_embeddings(model, locator_and_image_iterator)

df_embeddings = pd.DataFrame(locator_and_embeddings, columns=["locator", "embedding"])
upload_dataset_embeddings(dataset_name, model_key, df_embeddings)
Once the upload completes, we can now visit
Datasets,
open the dataset and navigate to the
Conclusion#
In this tutorial, we learned how to extract and upload vector embeddings over your image data automatically and manually.
FAQ#
Can I share embeddings with Kolena even if I do not share the underlying images?
Yes!
Embeddings extraction is a unidirectional mapping, and used only for natural language search and similarity comparisons. Uploading these embeddings to Kolena does not allow for any reconstruction of these images, nor does it involve sharing these images with Kolena.